Our focus is to develop exciting interior environments through the application and installation of decorative wall panels.
We are delighted to present our line of architectural wall panel products that offer an alternative to traditional wall treatments. Our designs offer solutions to meet the needs of modern interior design on both a commercial and residential level. 3D Walls enhance interior environments in homes, restaurants, clubs and hotels.
The Suncoast Collection manufacture all our 3d Panels, made in the USA, not from China.
• All of our plaster 3D wall panels are manufactured from the highest quality Gypsum plaster.
• All of our 3d Wall panels can be manufactured in either plaster for interior use or precast stone for exterior applications.
• Panels can be installed either in tile format or the joints can be filled to create a stunning continuous decorative wall.
Our 3d Wall Panels are adhered to the wall with the joints filled to give a seamless 3D wall (our 3D wall panels may require some surface filling and sanding as part of the fitting process). All panels match on 4 sides and can be installed horizontal or vertical. All decorative wall paneling can be painted. Light shadowing can be produced when panels are illuminated with up and down lighting.
- Beautiful contemporary design.
- Manufactured in gypsum plaster.
- Can be filled for seamless joints.
- Wall panels supplied unfinished.
- No Vocs Fire Rated – (unlike MDF panels)
- Green product – environmentally friendly (see our green pdf)
All of our 3D wall panels come with an installation guide. Following the installation instructions all panels can be made “seamless” so that no break or lines show between the panels. – ALL of our patterns are computer designed so the pattern seamlessly flows from one panel to another. Out standard repeating seamless pattern panel designs are available in a 4’x4’. 4 feet wide x 4 feet long= 16sq ft and 2’x2’ 4 feet wide x 2 feet long = 8 sq ft per 3D wall panel.
3d Wall panel FAQ
- What are the panels made of and can they be cut?
Panels are made from the highest quality Gypsum plaster. Yes they can be cut - Q. How long does it take to get the product from the time I place the order to the time I receive it?
All of our products are IN-STOCK ready for immediate delivery. It takes about two days to build a crate and shipping time ranges based on destination. For Canada the same applies except to add 1-2 extra days for customs clearance. - Q. What are the sizes available?
Panels are available in 4’x4’ and 2’x2’ - Q. How long does it take to make a custom order and what is the minimum quantity required.
A. For in-line products required in thicker gages it takes 45 days for production and shipment to our facility and there is no minimum. For custom designs, we require two weeks to develop the prototype + 1 week to get it to the client for approval + 45 days for production & shipping and the minimum quantity is 50 panels. In the event the design is suitable for our company and the client agrees, there would be a minimum to the client of 10 panels and we would keep the rest for sale to others. - If the panels measure 4’x4′ and the height and length of my wall is 10’x10′, do I have to buy full size panels for the extra two feet of difference?
A. No, we are willing to cut panels in half to reduce waste material. A charge of $25 cutting fee will apply.
3d Wall Panel installation questions
- What is “seamless” pattern flow and how is this accomplished?
A. The panels are designed so that the pattern flows from one panel to another. To make them “seamless” is a process that makes the lines between two panels disappear so that it looks like one solid wall with no breaks. To make a wall of panels seamless, this requires the application of a filler type material in the joints where two panels meet. The filler is allowed to dry and then sanded by hand so the filler blends with the material and the lines disappear. It requires a bit of labor in sanding, but is not any more difficult than installing drywall. - How difficult is it to install these panels?
A. On this question please refer to our installation instructions for details, but in summary the panels are installed with a combination of panel adhesive on the back like liquid nails, and counter-sunk screws. Once the panels are installed, the filler material is applied to the screw holes and the seams between the two panels.
3d Wall panel installation
Our wall panels are designed to be joined together so that the pattern can span a large area. However, if you want a seamless pattern then some finishing work is required. It is not difficult, and is similar to installing drywall and making the joints in the drywall seamless.
Below are the basic instructions on how to install our 3d wall panels. It explains our mounting and fixing procedure as well as how we fill the joints and screw holes so that you have a completely seamless wall.
3d Wall panel installation instructions PDF (same info as below)
- What you will need
Below is a list of items for installing the 3D plaster wall panels:
- Damp cloth
- Bucket of water
- Sandpaper (80 grit to sand initial filler, 220 grit to ‘clean’ edges and 400 grit to bring to finish grade)
- Spirit level
- Pencil (for marking)
- Plastering filler
- Primer paint (required prior to any paint finish)
- Paint (for final finish)
- Adhesive (for gluing tiles to wall). There are a few options: contact adhesive spray, Liquid Nails
- Drywall Screws
- Wall preparation
The final finish relies greatly on the surface preparation. The walls must be made clean and smooth before the panels can be installed. Here are a few tips:
- Clean surface – .Use damp cloth to clean wall of dust etc…
- Rough up surface – If you are installing panels over glossy paint rough up the surface with sandpaper to dull the finish and create a jagged surface for bonding.
- Allow drying time – Allow 24 hours for drying if the wall has been wet in any way.
- Tile acclimatization
Panels need to acclimatize to the local temperature. Unpack you panels and ensure your panels sit for at least 48 hours to allow as much air as possible to flow around the product. Moisture absorption from rain should not be encouraged at this time.
- Design ideas
- Think about design – You must determine if the installation will be a wall-to-wall installation or a featured paneled area with a border around. You can center a group of tiles in the center of your wall or have a single strip running from one wall to the next. To ensure you will be happy with the installation before you start installing you can lay the panels on the floor and draw a grid on the wall (the same size as the tiles) to help you decide.
- Working around power points – If you are cutting around power points or light switches, backing plates can be added to the back of points and switches to lift them from the wall – allowing the products edge to be concealed. Ask your electrician about this option. Power point sockets are also available in plaster to complete your look.
- Installing boarders – Any material can be used as a border even a recess – offering a very modern shadow line. Baseboards are also available to finish off your wall.
- Set out
Depending on the design you may want to find the most visual point on your wall. The most visual point on the wall is where your set out point should be. To find the most visual point on the feature wall arrange your furniture as it will be with the new feature wall in place. Walk into the room and mentally note what part of the wall you are visually drawn to first. It may be a window, or where the walls meet the ceiling or a recess in the wall. This will be your set out point and where you will start using full and uncut panels.
- Installation
We now have a set out point, so keep your spirit level, tape measure, and pencil handy.
- Mark out a vertical and horizontal starting point with your pencil.
- You now have a marked out starting point that is level.
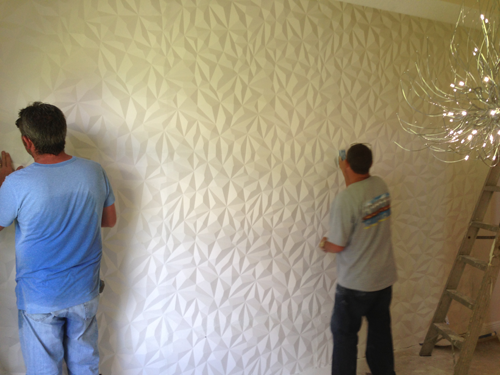
- Mark out where the studs are on the walls to make screwing the panels into the wall easier. Take your first panel and apply adhesive and line the tile up with your pencil lines. Press down firmly for at least 10 seconds. Then using marks where studs are screw into the panel. This first panel will act as a guide for the following panels ensuring that your panels will be laid straight from here on. Take your second panel and butt/marry the second panel into the first. Take care in making sure the panels are butted as tightly as possible to one another. This will help minimize noticeable seams. Keep a damp cloth handy to wipe off any excess glue after each panel installation.
- Filling gaps
Ensure you are happy with the panel adhesion to the wall and check that all panels are secure. Fill any gaps between panels with the plastering filler. Wipe off excess filler with your finger. Don’t worry if you remove part of the filler as you can reapply again once the product has dried and remember to clean off excess as you cannot sand some gap fillers. Allow to dry as recommended then sand back entire paneled surface with sandpaper.
You can use 5 minute mud, or any cheap plaster filler. Fast drying pre-made filler /spackling is convenient.
- Painting
You do not have to paint these panels. You will have to decide for yourself if you want to paint these or not.
Once you wipe down the plaster, it is ready to be primed. After primer is left to dry fully panels can be painted using general household paints. The panels can be painted with either a brushed, roller, or spray gun, but speak with the reseller about the best way to paint the pattern you have bought.
Alternative method of installation large wall panels – video
SHIPPING & DELIVERY
Each panel is boxed individually to protect the finish. For shipping purposes, panels are crated at a charge of $65 to $85 depending on order quantity.
SHIPPING DAMAGES: Please inspect carefully your shipment upon receipt. If you see any puncture points to the crate or damages to the side of the panel crate or boxes please indicate so upon signing the receipt of the bill of lading. In the event that panels are damaged and rendered unusable please contact us immediately. Upon receipt of email pictures from you, we will file a claim with the trucking company and arrange to replace the damaged goods. All damaged panels must be retained until they are picked up by the salvage division of the trucking company.